Monday, 11 November 2019

An Early Update

Normally I update Wessex Professional once a year, the last update was posted in the spring (2019). But I have another update for the autumn (4.4.8).

It all came about when one of my largest users asked me if the program could be made to show the progress of a job through the workshop, and also to produce an Excel list of jobs to be done. My first thought was to produce a modified version especially for them, but thinking about it I realised that these features could be a useful for all users.

So, lets go through the new features.

  • If you use the "Staff" option then the staff member is now saved to the database, instead of just being printed on the initial invoice and work ticket.
  • Likewise the Deposit amount paid is now saved. If you take deposits the program remembers so you don't have to!
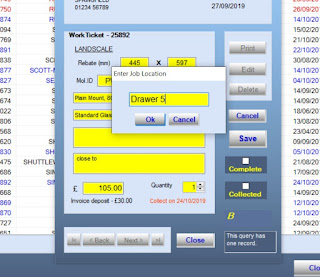
  • Location, location location! On the Work Ticket record you can record the location of the item. Not only its final place waiting for the customer to collect, but whereabouts it is before and during the framing process. So no more wondering "I put that safe somewhere, didn't I?"
  • An Excel report showing the work to be done in the order it needs doing, including the customer's name & phone, can be created. Go to "Tools" > "Manage Database" > "WorkTickets" and Click on "File". Select "Excel Report" and a file titled "Job Sheets (+ the date) " will be saved to your Desktop.
  • Finally - in go to "Setup" > "Options", then the "Database" tab and select "Database Utilities", you will see at the bottom at box titled "Execute SQL". This allows an SQL statement to modify the database. If you don't know what SQL (Structured Query Language) is - ignore it. If you do use it always make sure you have taken a backup of the database beforehand. The reason it's there is to give the facility to make bulk changes to the database where it would otherwise need to be imported into Access.
I've been using this version in my framing shop for a few months now and I'm quietly pleased with it. I hope you will be too.

Sunday, 29 September 2019

More on Frinton > Wessex

A bit extra to the previous post , which describes how to change over Frinton mouldings to Wessex.

There is an (initially) perplexing problem where it seems that some Frinton mouldings have been marked as "discontinued" incorrectly.
"Oh dear!" I thought (or something close) when this turned up on my work computer.
As always it's wise to be like Corporal Jones and "Don't Panic".
After little sober reflection I realised that the problem lies with mouldings that were sold by both Wessex and Frinton and had a Wessex reference and a (different) Frinton reference.

So, to clarify - the moulding which showed as "discontinued" for me was (in my moulding records) Frinton M03021. Now Wessex also have this listed, and their reference is "C2105" and this is the reference used in the update file.

How to sort this out? I have come up with 2 scenarios.

The first is if you use the supplier's reference as the moulding ID. Simply change the label on your chevron to the Wessex number.

The second is if you use a different ID from the supplier number (for me that moulding was "117"), then you can edit the record to change the Supplier & Supplier Number.

The good thing about the second method is that all the job records which have used that moulding are changed too. Whereas in the first method they will still have the original ID, so it's probably best to edit the record and put the Wessex reference in the Notes section.

The records that start "WF", "PW" & "POL" are not affected, but if you come across an odd "Discontinued" best to give Wessex a ring just to check.

Friday, 6 September 2019

Wessex & Frinton moulding changes

As you have probably seen Frinton Mouldings are now being merged with Wessex Pictures.
This means that in future the mouldings that used to be listed under Frinton will now be listed under Wessex.
Only one update file will be issued (WessexMouldings.xls).

So, how can we get the program (WPP4) to sort this out?
Fortunately it is quite simple.

  • Make sure your version of the program is at least 4.4.7 (To find out which version you have click on "Help", then "About").
  • Preferably before you run the update mouldings routine you need to change the name of the supplier from "Frinton" to "Wessex". 
      Do this by going to -
  1. "Setup" > "Options" and choose the "Database" tab. 
  2. The top left frame is Database Utilities - click the "OK...." button.
  3. Take a copy of the Database "just-in-case".
  4. Go to the third frame down and select "Change Supplier Name".
  5. Select "Frinton" from the list of suppliers, and click "OK". You'll will be prompted to enter the new name (in this case it is "Wessex"). Click "OK".
  6. All the Frinton records in your database now have Wessex as the supplier.  - Job done!
  • Now you can run the update mouldings routine using the latest WessexMouldings update file. 
  • NB. If you have tried to run the update before changing the supplier name, you will find that a lot of mouldings have "failed to be added". This is because the Id (which must be unique) of those mouldings is used under the Frinton supplier name. Simply run the update again after you have changed the supplier name from Frinton to Wessex.
Now you are upto date.


Monday, 13 May 2019

4.4.7

Just in time for the Roadshows we've released the latest version of Wessex Professional.
The changes and new features are really down to the fantastic response from the users of the program.

Version 4.4.7, new features


  1. Error in "Guest" moulding pricing corrected. The price calculation when using the Guest moulding option did not include wastage. So, if you priced a frame with a moulding from the database and then, using the same width & cost figures, with the Guest method, you would get two different prices.
  2. Error in "Moulding needed" ("Tools">"Manage Database">"Mouldings">"Views">"Mouldings Needed"). Now shows correct amount of moulding needed for current jobs
  3. Updating mouldings from an Excel file is now more user friendly.
  • The problems mentioned in the previous post are all sorted out.
  • If a moulding has been discontinued, previously it would just be marked as such. Now, if it has not been used in any work tickets, it is deleted. If it has been used then the record is marked "Discontinued". This avoids "clutter" in the mouldings records.
  • Visually you can now see the numbers of records updated, added, deleted & discontinued as the update is taking place. 
The option to update from a supplier other than Wessex or Frinton is now a dropdown list of the existing suppliers in the database. This is to minimise errors (spelling, or calling the same supplier by two different names).
However this does mean that if you want to add mouldings from a completely new supplier you will have to create one new record manually ("Tools">"Manage Database">"Mouldings", then click "File">"New Record"). This will then add that supplier to the dropdown list.

4. Two new database utilities have been added. These can be found in "Setup">"Options" and select the database tab, click "Database Utilities" (at the top left of the tab). NB. It is wise to have made a backup of your database before making any changes.

  • You can now change the Supplier name in all of that supplier's records. this can be useful not only if the supplier has changed their name, but also if you have listed the supplier under different names, ie. R&H and Rose & Hollis, (the program treats these as different suppliers).
  • You can now zero the "moulding used" figure in the moulding records. Useful if you want see see the most used mouldings each year. (Previously this was a read only figure).
5. When "Editing" or "Adding" a moulding record you can choose from a list of existing suppliers in the database, or add a new one.

Hope you feel, as I do, that the changes make the program more productive and user-friendly - enjoy!

Saturday, 9 March 2019

Problems updating other suppliers.

A couple of framers have contacted me recently with problems trying to update mouldings from a supplier's list.
At first glance everything looked good.
The file was ".xls".
The headings were all correct.
There were no blanks in the list.
The worksheet was titled "gen"

Looking more closely I noticed that one of the files contained apostrophes in the description (why?).


While the other had the width as a decimal. (The last column in the screenshot).


Both of these things will cause the update to fail.

The solution?
For now you will need to edit the data from within Excel.
In the first instance (the apostrophes), in Excel, select the column, click on "Find & Select", then "Replace" and follow the prompts.

For the second (the Width as a decimal number), select the column, click on "Number". It will be shown as "General", change this to "Number". Then click twice on "Decrease Decimal" (see below)


The numbers will change to integers (ie. no decimal point).
Save the file, and all should be well.

The next version of the the program (look out for version 4.4.7 in the next few weeks) will handle all this automatically.